I first stripped the PVC outer insulation off by pulling the fiberglass string in the cable and ended up saying "Doh!" because I didn't wear a long sleeve shirts, gloves and safety glasses when I did it. Even thought I was using a pair of needle nose pliers to hold the fiberglass, I still ended up being impaled with those nasty fibers.
The 115 inch long stripped sets of 4 twisted pairs had a light natural twist (about 1 turn/foot) so I decided not to braid the individual twisted pairs on this set of cables (more sloth).
I clamped the ends of the 16 sets of twisted pairs to a work table. Don't use your wife's nice dining room table! Note: The end of the cable in the clamp gets cut off after you are braiding, so clamp at the very end of the cable.
I then "figure 8" coiled the tails of the twisted cables until I had 3 feet of cable hanging loose. The circle diameter of the loop in the figure 8 coil was about 4 inches in diameter. The wire naturally took this bend with not much force. I lightly secured the middle of the "figure 8" with a pair of twist ties from a box of garbage bags. As I "4-braided" the cables, I would let more wire off the coil. These cables braided fast. I like the "rope" look of the finished cable a bit better than the 3-braid pictures I've seen too. (Proud papa syndrome again?)
The 4-braid goes like this:
 Each color
represents a set of 4 twisted pairs. The braid was fairly loose (not limp).
Each braid ended up about 1 3/4 inch apart. The numbers on the side of
the diagram count the braids. Every four "4-braids" the overall pattern
starts over.
Each color
represents a set of 4 twisted pairs. The braid was fairly loose (not limp).
Each braid ended up about 1 3/4 inch apart. The numbers on the side of
the diagram count the braids. Every four "4-braids" the overall pattern
starts over.
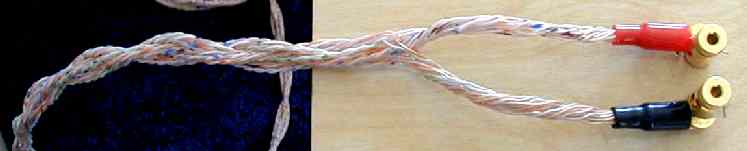
After the 4-braiding was done, I untwisted and separated out 6 inches of the individual strands from each end. I put all of the striped conductors to the left and the solids to the right. These were given a light twist by repeatedly and gently twisting the 16 individual wires so that the natural wave in the copper caused them to tangle into a reasonable looking twist.
Some of the individual wires were a little longer than others, so to make the cable look neat, I cut the ends back to about 5 inches before I started stripping the Teflon (tm) off.
I stripped 1 1/2 inch off each wire, tightly twisted the exposed copper and solder the ends (Kester 44). I then crimped Radio Shack 278-311A Deluxe Snap Spade Connectors on the ends. (Yes I know this is not the best way to connect spade lugs to wires.) I used the Red cover for the striped and the Black cover for the solid wires. After I ohmed them out, I hooked them up to the Paramours and Horns: I was favorably impressed. Everything seemed tighter and cleaner even with no break-in time. Before I installed these cables, I was using Tara lab's "Space and Time" cables.
Using a cheap hand held capacitance meter I measured 2000 pF for the cable capacitance. Using a power amp with a 3 ohm output impedance feeding a 8 ohm speaker (2.2 ohm node impedance) the -3 dB point from cable capacitance is: 1/(2 * pi * 2000 pF * 2.2 ohms) = 36 MHz.
I don't know what my output transformer's loading capacitance is, so I don't know if the extra capacitance will pull the - 3 dB point below the CB radio band. ;-)
Notes:
(1) 16 AWG # 24 wires is the equivalent to AWG # 12. Every time you
put two wires in parallel, they drop 3 AWG.
Two # 24 = one # 21(2) I've been told a crimp covered with a heat shrink filled with thermal set epoxy is the best connection. I believe it. I just happen to like solder and I don't know where to buy that special epoxy filled heatshrink (I really haven't looked very hard.)
Four # 24 = two #21 = one #18
Eight # 24 = four #21 = two #18 = one # 15
Sixteen #24 = one #12
(3) "Figure 8" coiling of cords and cables tends to not get tangled up like when you make circle coil of wire.
(4) More ways to braid can be found here: Braids
(5) From the Mohawk cable page, the following are the characteristics for the CAT 5 cable I used (remember, I used this cable because it was scraps I already had):
M55988(6) The leakage inductance of the transformer working into a 8 ohm load will make the -3 dB point much much lower than 36 MHz.
Plenum 4 Pair (100 ohm input impedance)
24 AWG
UTP FEP Teflon
Jacket: ** White ThermoPlen *
.186 4.7 24 36 UL, c(UL)
CMP, MPP
I'll probably end up using Chris's 3 by 3 by 3 braid (27 strands of wire.) My fingers are starting to ache already.
You can also do 3-braids of three 4-braids and 4-braids of four 3-braids etc.