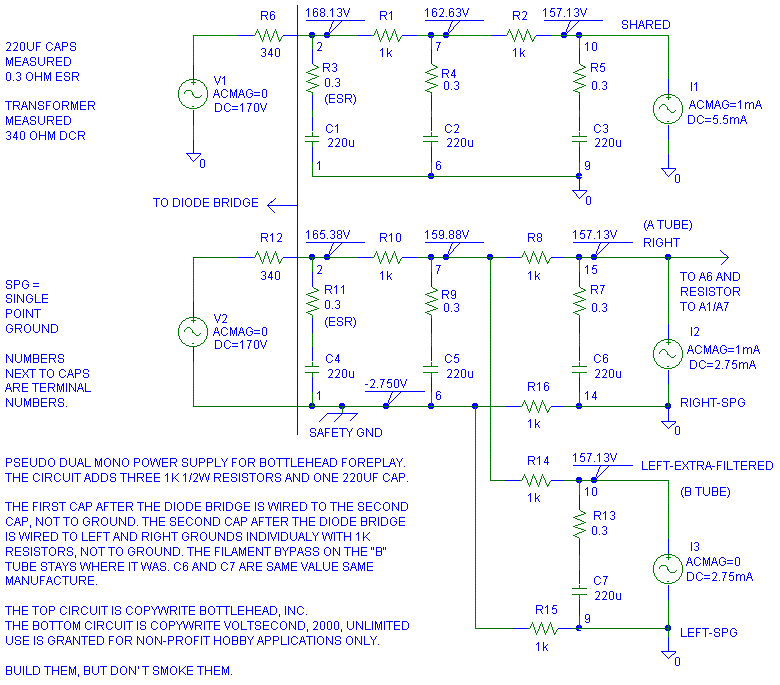
For the cost of three 1K 1/2W resistors and one more 220 uF cap you can have a Pseudo Dual Mono power supply (PDMPS) for the Bottlehead Foreplay Preamp.
The best way to describe the audible changes with this mod is that the instruments became more in focus and the sound stage got deeper. Not that all instruments sounded further away, some stayed in front, some moved further back. I could just be suffering from proud Poppa syndrome. However, I think I'm going to earn a lot of Dr Peppers with this one, better make them diet Dr Peppers.
This mod does not reduce the output noise as much as it reduces the cross talk between left and right channels. This mod also allows more advanced grounding schemes to be used between left and right channel.
C5 I used was a junk box CDE 330 uF 200V 0.1 ohm 10 kHz ESR. (Use a 220 uF 200V, it will fit much easier!) The only place left ground touched right ground was through the RCA connectors to chassis and the two 1K resistors. I used three 1K 1W metal oxide resistors for the changes because that is what Radio Shack had in stock. I used the stock 1K (R2) for the fourth 1K. One 220 uF output capacitor stayed on terminals 9 and 10. The other 220 uF capacitor was installed terminals 14 to 15. The old terminal 15 connection ended up floating in the air.
I double checked capacitor polarities and the tube socket ohms before I applied power for the first time. After I applied power (with my safety glasses on), I checked the tube socket voltages: they stayed the same.
With the original two prong power cord Foreplays, the negative side
of C4 and C5 should measure 480 to 520 ohms to chassis ground.
C7 and C6 should be matched to be from the same vendor. C5 can be any where from 100 uF to 470 uF. Low ESR in the capacitors is more important than lots of capacitance. The easy way to do this is to buy a new cap for C5 and use the original 220 uF caps for C6 and C7.
If you implement this set-up with the RCAs isolated from chassis, I also recommend that you buy two 10 ohm resistors and try separating the left and right grounds from chassis. To do this, lift the star ground and arrange the grounds so that left channel ground does not touch right channel ground except through resistors. After you measure >200 ohms between the left and right grounds, connect a 10 ohm 1/2W from left signal ground to chassis and a separate 10 ohm 1/2W from right signal ground to chassis. Since I haven't done this to my Foreplay yet, lift the ground so you can easily put it back in case it doesn't work.The isolated RCA mod is is Untested, I get ideas faster than I can build them!
Check the leakage currents from all metal parts to safety ground before touching (or using) this or any other two prong equipment.
The 10 ohm to chassis should help limit some hum problems such as :
1) If an interconnect goes open (the 10 ohms should make the hum at the speaker is less loud).
2) If the chassis floats, it doesn't shield the wiring from hum.
3) It breaks up the ground loop between left and right channel.
The filament bias resistors and capacitor should only touch C6 or C7 in the schematic below, not both.Here's the circuit before and after:

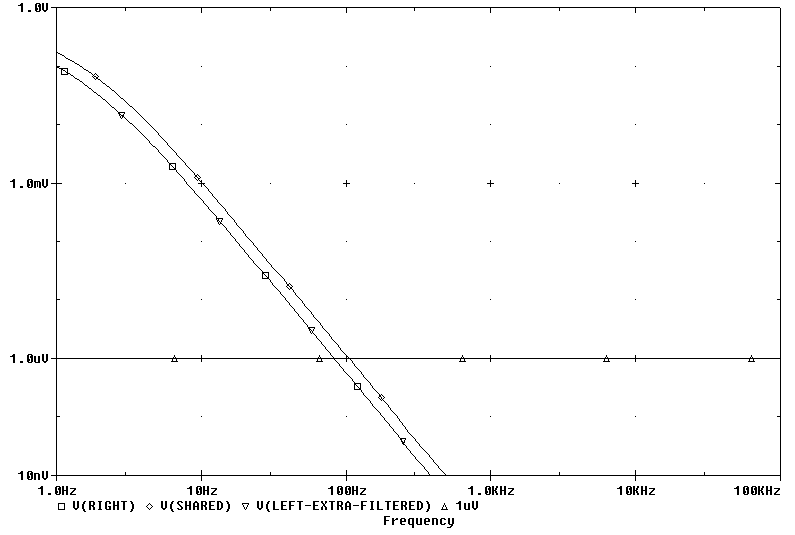
First let's check the "ideal" power supply output ripple with 1V applied at V1 and V2. I stopped the plot at 10 nV because voltages even in the uV range are too layout dependent to believe a Pspice analysis. The Pseudo Dual Mono PS change improves the output ripple only a little bit, but the stock circuit didn't need much improvement. (Doc Bottlehead and company's designs are well thought out!)

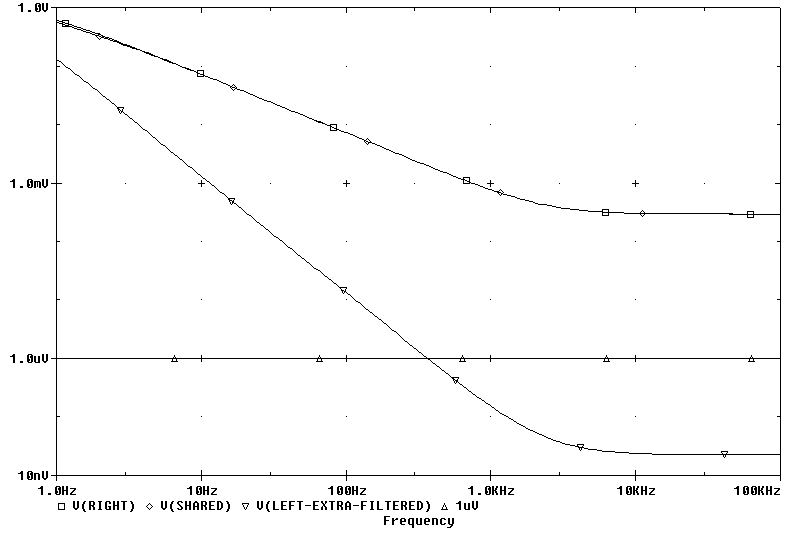
Now lets check the cross talk from the right to left channel power supply rails with 1 mA of output current. The tubes will have some inherent power supply ripple rejection which will reduce the cross talk further between channels. The added cap and resistors reduce power supply induced cross talk an additional 60 dB (1000:1) above 180 Hz . With this much (inexpensive) attenuation, the circuit layout and wiring will dominate any cross talk.

Enjoy - VoltSecond, July 2000.
DaveT tried these instruction out and found them acceptable (Click for a link to his comments).
One way of many to hook up the capacitors shown in my PDMPS schematic. This is based on the Stock Foreplay. If you have the Anticipation mod, you'll have a few more wires to move.
The capacitors will be positioned here:
C4+ 2 C4- 1 (existing)
C5+ 7 C5- 6 (existing)
C6+ 10 C6- 9 (existing)
C7+ 15 C7-14 New! This cap must match cap used on terminals 9-10.
I have not thoroughly checked the following list, DaveT had good luck with it. Please check it yourself before proceeding. Make sure the capacitors fit before even turning the soldering iron on. Make sure the unit is unplugged and capacitors discharged before you go poking around. No warrantee is given or implied with this. I am doing this by looking at a Foreplay layout and my PDMPS sketch at the same time.
Remove wires
9-14
1-14
Move the 14 end of the 6-14 wire from terminal
14 to terminal 1 so that it becomes a wire from terminal 6 to terminal
1.
The 1K resistors may not touch anything but the terminals they attach to. The 1K resistors should be more than 1/8 inch from any of the capacitors. Sleeve the leads of the resistors if they come close to other bare metal objects.
Add 1K 6-14
Add 1K 6-9
Add 1K 7-15
Check for shorted leads, clean and check your solder joints.
Move wire from A6-11 to be A6 to 15
Move resistor from A7-12 to be A7-15
Move the original A8 to 15 to "A output" capacitor so that it goes directly from A8 to "A output" and no longer touches 15. Let the output side of the cap hang in the air, not the side that attaches to A8. Sleeve any leads that look like they may touch any other part or terminal.
Add capacitor 15 (+) to 14 (-) that is the same value and vendor as the capacitor from 9 to 10.
Move all B grounds (going to the B volume control and B-tube resistors) from 14 to 9. The A grounds stay on 14.
Check for shorted leads, clean and check your solder joints.
Safety ground needs to attach to terminal 1! If there is a primary to secondary short in the transformer, this will be it's return path to safety ground.
Recheck ohms from Foreplay manual using terminal 14 for tube A ground and terminal 9 for tube B ground.
Double check the polarity of the capacitors. Negative (-) to ground on all of them.
Visually check:
The A8 resistor, A RCAs, A volume pot, A3 resistor
go to terminal 14.
The B8 resistor, B RCAs, B volume pot, B3 resistor,
B9 resistor and B9 cap go to terminal 9.
Measure ohms from these points:
2 - 7 1K
2 - 15 2k
2 - 10 2k
15 - 10 2k
Ground to terminals 1 and 6 should now read 500
ohms or 1K depending on if the RCAs are insulated or not.
1 - third prong on power cord: zero ohms.
1 - 6 zero ohms
1 - 14 500 ohms if left and
right SPG are tied. Twice that if left and right SPG are not tied. 0 if
RCA ground and safety are attached to chassis.
1 - 9 500 ohms if left
and right SPG are tied. Twice that if left and right SPG are not tied.
0 if RCA ground and safety are attached to chassis.
I’d attach a 9V battery through a 1K resistor positive to 2 and negative
to 1 and check that you read about 9V:
6 to 7
14 to 15
9 to 10
This is a modified copy of my post on attaching safety ground to the PDMPS from the Bottlehead Forum 14 Jun 01:
1. The negative of the first cap (C4) after the diode bridge goes to earth (safety) ground in the PDMPS. If there is a winding to winding short in the transformer, this sends the fault current to safety ground. Do not use a Ying-Yang diode here. I've seen a few winding to winding shorts in my life and if you get to see a winding to winding short, a good safety ground connection will increase your chances of being around to see a second one.
2. The case of the power transformer must to go to safety ground too. If there is a short from the windings to transformer case, this sends the fault current to safety ground. Do not use a Ying-Yang diode here. Insulating the power transformer from chassis and running a bonding wire to the transformer is a decent grounding method. (Note: I've also seen winding to transformer case shorts.) Single point grounds can be important on safety ground schemes too.
3. I strongly recommend that chassis attach to safety ground. If a 115V solder joint breaks loose and hits the chassis, this sends the fault current to safety ground. (I not only have seen this failure, I've been shocked by it because someone didn't hook the chassis to safety ground like they should have. I use four and six letter words other than "ouch" when this happened.)
4. To be safe you should also attach the RCA grounds at the floating SPG (Single Point Grounds) to safety ground too. Some people are choosing not to do this and adding a Ying-Yang diode from safety ground to SPG. (The diode must be rated for more current than the line fuse.) If you choose to use the Ying-Yang diodes (Buddha's idea?) with the PDMPS, you'll measure 1K from earth ground to left and right RCA. This 1K is from R15 and R16.
I do not believe the Ying-Yang diodes meet UL/ CSA requirements unless the transformer is double insulated. Officially, all exposed metal on a piece of electronics needs to go to safety ground. Because of this, I am not recommending that you float RCA ground from safety ground. If you do float the ground, you must accept the reduction in safety yourself.
I have heard of cascading more than one set of Ying-Yang diodes in series between safety ground and signal ground. This was done because there was more than one diode's worth of noise between the two grounds.
A Ying-Yang diode is two diodes attached in parallel. The band of one diode goes to the non-banded end of the other diode. (The anode of one diode is attached to the cathode of the other diode.)
5. I think I heard someone suggest using a separate Ying-Yang diode
from safety ground to chassis ground. I really don't like this idea. I'd
rather have the chassis at safety ground.