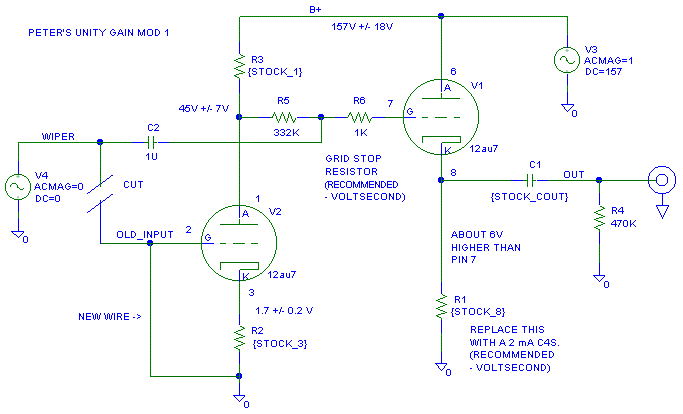
Peter's simple mod to the Foreplay
In the mods below, I'll propose different values than what Peter used. I'd seriously spend the money and C4S this and all cathode follower configurations. I also recommend a grid stop resistor in the cathode follower.
This is the Foreplay Mod that Peter posted. I'd use a 200V part for C2, those who live risky will use a 100V part.:

This is a variation on Peter's mod. Note that I am adding the 100 uF from pin B9 to ground. If you just want to try this out, omit removing the resistor from pin 1 to B+ (like Peter did) and omit the extra capacitor from B9 to ground.
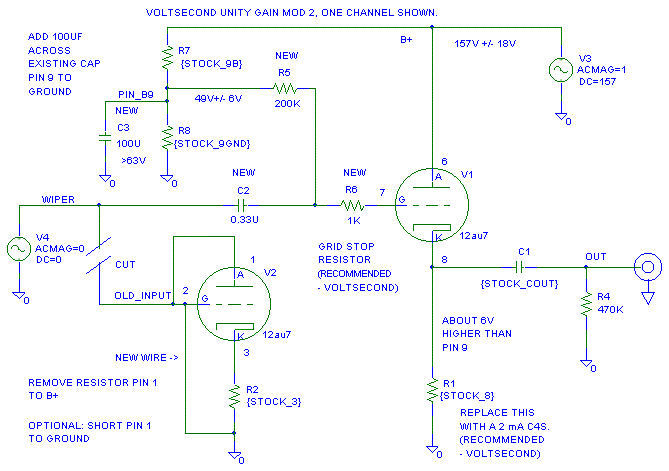
This change will set your gain to unity and may help with some noise issues.
Instruction for this Mod, Mod 2
Try this at your own risk.
First edition 04/07/01 Last update 04/07/01
Parts you will need:
Two 1K 1/4 W metal film
Two 200K 1/4 W metal film
Two 0.33 uF >120V capacitors. (Solen and Axon are OK, spend more money
if your wallet can take the pain.)
One >100 uF >63V aluminum electrolytic capacitor.
Unplug the unit and remove the tubes.
Check to make sure the capacitor voltages are less than 10V.
* If you are using a –20 to –50 dB Sweet Whispers, solder a wire across the 90.9K resistor the channel being modified. You are shorting out the wire just in case you don't like this mod and you want to go back to the original version. After you decide to keep the mod, replace the 90.9K resistor with a wire. If you aren't using a padded volume control, why are you doing this mod?
* Remove the wire from B2 to the volume control at the volume control
end.
* Remove the wire from B1 to B7. (It is OK to cut the wire in half.)
* Remove the 120K resistor from B1 to terminal 12. (Optional)
* Connect B2 to ground with wire that used to go the volume control.
(Attach to ground side of the resistor that attaches to B3. Leave the resistor
accessible, we may want to play with it later.)
* Connect the >100 uF >63V capacitor + to B9, - to ground (Terminal
14) Sleeve ground lead. (This capacitor reduces noise, you only need it
to keep the amp quiet.)
* With the body of the resistor one to two lead wire diameters from
the tube pin, solder a 1 K to pin B7.
* Connect a 200K resistor from B9 to the dangling end of the 1K on
pin B7.
* Connect a 0.33 uF > 100V capacitor from 1 K to 200K connection to
the volume control.
Now is the time to listen to one channel and decide if you want to do
the
other channel. The gain will be much lower on the modified channel.
If it shows promise, do the other channel:
* If you are using a –20 to –50 dB Sweet Whispers, solder a wire across the 90.9K resistor the channel being modified. You are shorting out the wire just in case you don't like this mod and you want to go back to the original version. After you decide to keep the mod, replace the 90.9K resistor with a wire.
* Remove the wire from A2 to the volume control at the volume control
end.
* Remove the wire from A1 to A7. (It is OK to cut the wire in half.)
* Remove the 120K resistor from A1 to terminal 12. (Optional.)
* Connect A2 to ground with wire that used to go the volume control.
(Attach to ground side of the resistor that attaches to B3. Leave the resistor
accessible, we may want to play with it later.)
* With the body of the resistor one to two lead wire diameters from
the tube pin, solder a 1 K to pin A7.
* Connect a 200K resistor from B9 to the dangling end of the
1K on pin A7.
* Connect a 0.33 uF > 100V capacitor from 1 K to 200K connection to
the volume control.
Voltages:
Use extreme caution when measuring these voltages:
A9, B9 = 49V +/- 6V
A4, B4 = Same as B9
A5, B5 = Same as B9
A6, B6 = 157V +/- 18V
A7, B7 = Same a B9 +/- 0.5V
A8, B8 = 1 to 2.5V higher than B9
1. Replace the resistor from A8 and B8 to ground with a C4S set to about 1.5 to 2 mA.
Variations of Mod 2.
Try this at your own risk.
First edition 04/07/01 Last Update 04/07/01
Current source loading a cathode follower works magic. It helped on my Foreplay preamp, it helps on my Chaperone preamp and it helped in my Paramour.
2. You have another triode just sitting there unused. This triode can be set up just like the triode used for the output and used as a tape monitor or as part of a tube cross-over. If you are using this as a crossover, make R1 and R2 the same value.
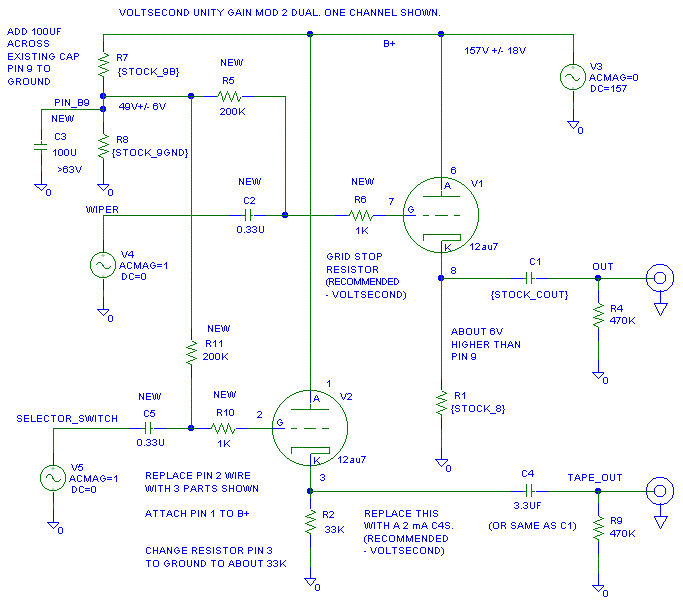
This is a variation on mod 2. Keep the 100 uF from pin B9 to ground. Please do MOD 2 first and then change to this MOD. What I am trying to do is make the extra triode into a current source. The bias voltage on both grids need to be higher for this to work correctly, but this is still an easy mod. You can even omit adding R9. This version does not use a C4S.
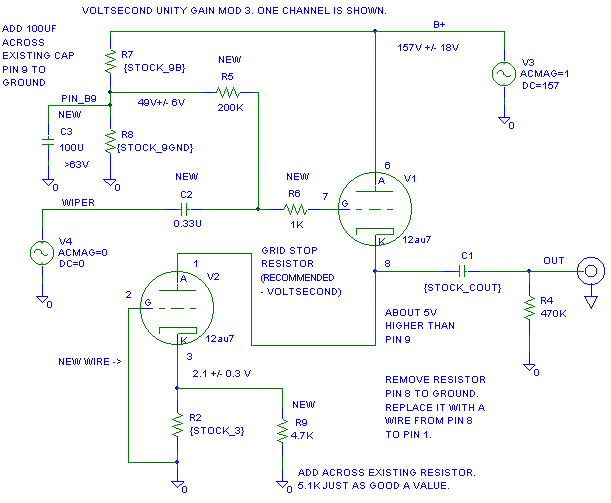
On this version I spent some time optimizing the current source performance vs difficult of changes. This should work significantly better than Mod 3, but that in only on paper.
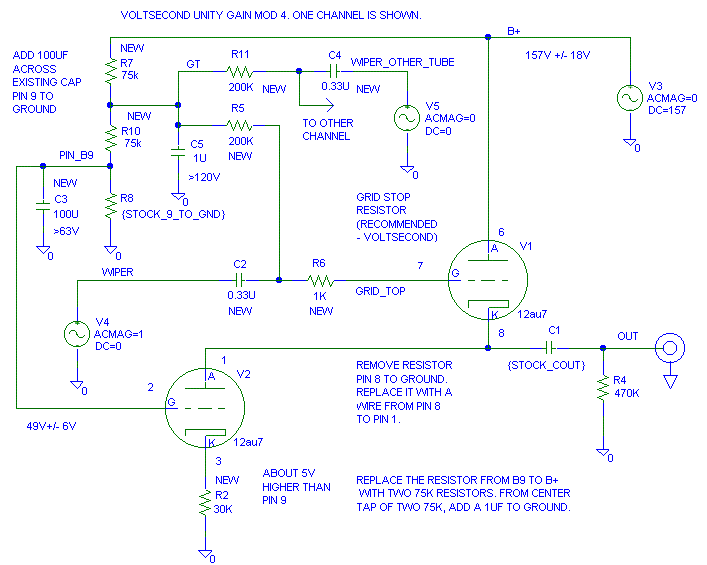
I may actually write up partial instructions for this one. ( Don't hold your breath. Leisure hours are very short right now. ) This version does not use a C4S, tube V2 behaves like a C4S.
C5 is to reduce cross talk between channels. C5 helps with power supply noise too, but its major purpose is to reduce cross talk.
Parts you will need for Mod 4:
Two 1K 1/4 W metal film
Two 200K 1/4 W metal film
Two 75K 1/4 W metal film
Two 30K 1/4 W metal film (Two series 15 K 1/4 W metal films will work
fine.)
Two 0.33 uF >150V capacitors. (Solen and Axon are OK, spend more money
if your wallet can take the pain.)
One >100 uF >63V aluminum electrolytic capacitor.
One >1 uF > 150V capacitor. A 200V Polyester/ Mylar is usually good
enough at this location.
Other ideas for this circuit:
1. Add a 200K from B9 to A2 and from B9 to B2. Then add a 0.33 uF or 1.0 uF >60V capacitor from A2 to A ground and from B2 to B ground. Even with all the capacitance on B9, there is still some noise on B9. This 200K and 1.0 uF capacitor will kill that noise about as dead as anyone would want it. (Keep the 100 uF on B9.)
2. As I mentioned at the end of this web page, this circuit will benefit from Pseudo Dual Mono Power Supply For Foreplay.
3. HV and Filament snubbers are fully recommended. Foreplay Filament Snubbers
4. Think small physical size for C3 and C5. Keep the bypass capacitors
to ground as far as you can from the signal lines while keeping the leads
on these bypass capacitors as short as you can (3/8" per lead is OK, 2"
per lead is not.)
This one needs grid stop and a "plate stop" resistor.
I have not optimized this much. I just wanted to show someone that a SLCF
can be done in a Foreplay. I added extra filtering for the
cathode follower bias. If you are going to use a SLCF, don't add any extra
noise from the bias voltages.
This mod may oscillate at high frequencies. You
may have to fiddle with the grid and plate stop values to get best performance.
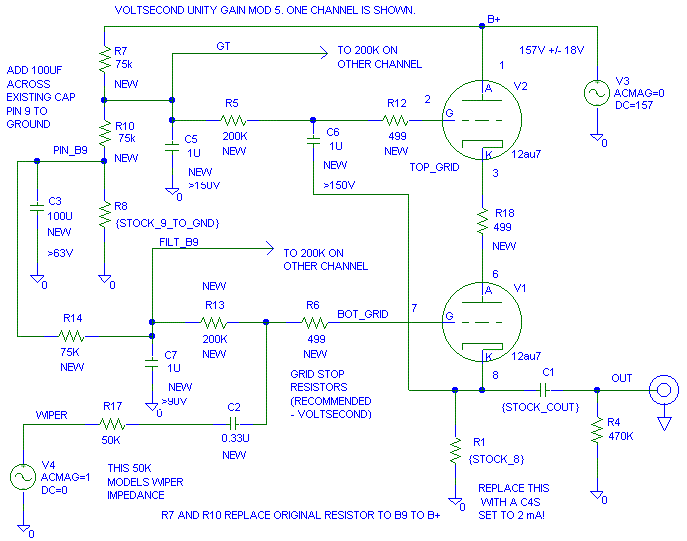
Power supply cross talk occurs when the current drawn from the left channel to make music on the left side makes a ripple voltage on the power supply that the right amplifier does not properly reject. Cathode followers don't have a lot of Power Supply Ripple Rejection (PSRR). 20 dB is the typical PSRR for a 12AU7. The only saving grace for the tube cathode follower is that the PSRR is constant from DC to many MHz.
For reference, a FET source follower that has more PSRR than a 12AU7
in the audio range can easily have 0 dB PSRR at 1 MHz. (Yes, we do care
about PSRR at 1 MHz.)