MacOS X Tips and Tricks
Preface
Here you can find my collection of MacOS X tips
and tricks. I will update this page time to time. Items are sorted
in chronological order, most recent entries first.
 |
MacOS X evolves very fast, so please take
into account that some tips may be obsolete, no longer accurate
or even dongerous by the time you read them (posting dates available
in update
history page)! Check your MacOS X version and MacOS X manuals
first! Additionally, MacOS X (unlike Linux) cannot
be "repaired" by means of reinstalling separate software
packages. If you accidentally screw up something inside MacOS
X, most likely you will have to completely reinstall
MacOS X. |
How to Solve PostgreSQL Startup Failure
Sometimes, under rare and weird circumstances,
PostgreSQL server may refuse to start on MacOS X with message "FATAL:
invalid value for option 'LC_TIME': 'en_US'". To solve
this, set LC_TIME to 'C' near the bottom of "postgresql.conf"
located in $PGDATA folder (its location may vary depending on compilation
and initialization options of PostgreSQL).
PS. If you have problem connecting to PostgreSQL
server after successful launch, this tip
might help you.
How to Change Ownership of Multiple Files
and Folders
It may happen that you have folder(s) full of useful
data on your media you wish to have full access to. You see them,
but you cannot do almost anything with them. This stuff, for example,
might be left from one of the other MacOS X user. MacOS X Finder allows
to change ownership and privileges of single files and folders, but
this operation cannot be performed recursively (at least, in MacOS
X 10.2.5 and earlier, Apple may change this in the feature). This
task may be completed with various freeware and shareware utilities,
however, in the terminal it simply faster (and NOT difficult as it
may sound).
|
Please remember: you should never
perform change of ownership and permission on MacOS X system
files and directories! It may render OS unusable or ill-behaved. |
First of all, you need to gain root
(superuser) access. Then, type in terminal "chown
-R -c" (without double quotes, with
extra space after "-c"), drop folder on the terminal
window (it will paste item and its path with necessary backslashes),
and finally press enter. You will see console log which will list
items with changed ownership.
How to Play DivX Movies on MacOS X
DivX is an extremely popular video format. Unfortunately,
it was a headache for Mac users for a long time. On classic MacOS
8/9, it simply did not work well (video decoding was unacceptably
slow and buggy). On MacOS X, official DivX
plugin for QuickTime player seem to work fine for video, but in most
cases required really awkward trick for audio track conversion since
QuickTime 5 cannot play mp3 audio embedded into AVI files. However,
after open source video players used primarily on Linux become available
on MacOS X, situation changed dramatically. At the time of this writing
(May 2002) there are two open source video DivX-capable players: MPlayer
and VideoLAN.
The first works in console mode and is controlled by AppleScript application
(really odd beast), however, the second is the full featured Cocoa-based
MacOS X native application. You may need to download and install open
source ffmpeg
QuickTime plugin in order to make them work. Please refer to the documentation
files supplied with VideoLAN and MPlayer for more information.
PS. Comprehensive DivX on MacOS X how-to is available
at Project
Omega home page.
How to install UNIX Inherited Software
without Altering MacOS X System Directories
This topic is completely moved to "Safe
and Happy UNIX Hacking with MacOS X".
Getting Missing UNIX Pieces for
MacOS X
MacOS X client misses some very useful Open Source
tools like bzip2, wget, Midnight
Commander, MySQL,
and some others. The best and safest
way is to use Fink,
a port of the package management system from Debian/GNU
Linux (one of the most powerful and advanced this days) for MacOS
X. More info available in another article "Safe
and Happy UNIX Hacking with MacOS X". Anyway, you can always
build necessary Open Source software yourself from the source tarballs.
How to Change UNIX File Attributes with
MacOS X Native GUI Tools
By default MacOS X Finder does not allow to change
UNIX user, group and some other attributes. However, it can be easily
done in terminal using "chown"
and "chmod" commands.
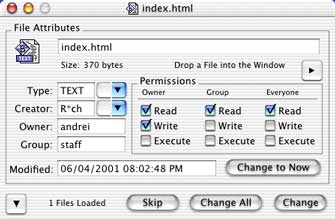 If
you have difficulty using command line tools (or just don't like them)
you can do this with shareware utilities - xFiles
written by Brian Hill or XRay
by Rainer Brockerhoff. Just launch xFiles/XRay and drop file(s) or
folder(s) into the file info window. However, there is a one little
problem - if you have launched xFiles/XRay from the MacOS X Finder
you will not be able to do a lot because you will not be given enough
access privileges to modify certain
attributes. It means that xFiles/XRay have to be executed in superuser
mode. First of all, you need to obtain a root
password (see tip below).
Then, open terminal and gain root access with "su"
command. To launch xFiles from terminal run this command "/path-to-xFiles-application/xFiles.app/Contents/MacOS/xFiles"
(in my case xFiles application is located in Applications folder inside
my MacOS X Home directory I run "/Users/andrei/Applications/xFiles.app/Contents/MacOS/xFiles").
This process is simpler with XRay which may re-launch itself in superuser
mode.
If
you have difficulty using command line tools (or just don't like them)
you can do this with shareware utilities - xFiles
written by Brian Hill or XRay
by Rainer Brockerhoff. Just launch xFiles/XRay and drop file(s) or
folder(s) into the file info window. However, there is a one little
problem - if you have launched xFiles/XRay from the MacOS X Finder
you will not be able to do a lot because you will not be given enough
access privileges to modify certain
attributes. It means that xFiles/XRay have to be executed in superuser
mode. First of all, you need to obtain a root
password (see tip below).
Then, open terminal and gain root access with "su"
command. To launch xFiles from terminal run this command "/path-to-xFiles-application/xFiles.app/Contents/MacOS/xFiles"
(in my case xFiles application is located in Applications folder inside
my MacOS X Home directory I run "/Users/andrei/Applications/xFiles.app/Contents/MacOS/xFiles").
This process is simpler with XRay which may re-launch itself in superuser
mode.
PS. After all, it may be better to learn how to
use UNIX "chown"
and "chmod" commands.
Typing commands in terminal might be just much faster than locating,
launching and customizing GUI utility.However, having choice is even
better.
How to Move MySQL Data Files into
Finder-visible Directory
|
Soon after I posted this topic
I found how to do the same much better
way. You need to install
Fink (port of extremely powerful and capable Debian Linux
package management system for MacOS X) and MySQL built as deb.
Fink maintains its own directory tree which is visible in the
MacOS X Finder. More info available here. |
 By
default MySQL keeps its data files in UNIX directory /usr/local/var
which is not visible in the MacOS X Finder. However, with little effort
you can move them where you like. In order to use MySQL you need to
add mysql user in MacOS X (see
instruction below).
MacOS X automatically will create mysql home directory, which, in
turn, contains standard directories like Documents, Library, Public,
etc. It is not recommend to use any of these directories (MacOS X
may reset permissions for these directories to defaults anytime),
but rather create a folder inside mysql user home directory (e.g.
MySQL-Folder, please avoid spaces), set read-write permissions for
this folder for mysql user, read-only for group and/or others (so
you can backups MySQL files without logging as mysql user), and move
MySQL data files there in terminal using "mv"
command. However, this is not everything, you need to tell MySQL where
to look for data files. There are 4 template configuration files,
each of which optimized for certain RAM amount available. If you run
MySQL on local workstation, just take "small" one. Run "open
-a TextEdit /usr/local/share/mysql/my-small.cnf" in terminal,
and save it somewhere in your home directory as text-only (not RTF)
file with name "my.cnf".
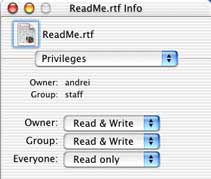
Set permissions using Finder Get Info -> Privileges (or use "chown"
command in terminal) for this file as read/write for yourself and
readable for everyone. If you do not do this MySQL daemon will not
be able to read, or you will not be able to modify it, you have always
remember that MacOS X is a UNIX! Next, set these variables in my.cnf
file.
By
default MySQL keeps its data files in UNIX directory /usr/local/var
which is not visible in the MacOS X Finder. However, with little effort
you can move them where you like. In order to use MySQL you need to
add mysql user in MacOS X (see
instruction below).
MacOS X automatically will create mysql home directory, which, in
turn, contains standard directories like Documents, Library, Public,
etc. It is not recommend to use any of these directories (MacOS X
may reset permissions for these directories to defaults anytime),
but rather create a folder inside mysql user home directory (e.g.
MySQL-Folder, please avoid spaces), set read-write permissions for
this folder for mysql user, read-only for group and/or others (so
you can backups MySQL files without logging as mysql user), and move
MySQL data files there in terminal using "mv"
command. However, this is not everything, you need to tell MySQL where
to look for data files. There are 4 template configuration files,
each of which optimized for certain RAM amount available. If you run
MySQL on local workstation, just take "small" one. Run "open
-a TextEdit /usr/local/share/mysql/my-small.cnf" in terminal,
and save it somewhere in your home directory as text-only (not RTF)
file with name "my.cnf".
Set permissions using Finder Get Info -> Privileges (or use "chown"
command in terminal) for this file as read/write for yourself and
readable for everyone. If you do not do this MySQL daemon will not
be able to read, or you will not be able to modify it, you have always
remember that MacOS X is a UNIX! Next, set these variables in my.cnf
file.
| datadir |
/Users/mysql/MySQL-Folder |
| innodb_data_home_dir |
Users/mysql/MySQL-Folder |
| innodb_log_group_home_dir |
Users/mysql/MySQL-Folder |
| innodb_log_arch_dir |
Users/mysql/MySQL-Folder |
Then, copy updated "my.cnf" into /etc
directory ("cp my.cnf /etc/my.cnf")
and restart MySQL daemon in terminal. If everything is OK you will
see message "Starting mysqld daemon with databases from /Users/mysql/MySQL-Folder".
Windows-compatible File Sharing Services
for MacOS X Client
|
This tip is obsolete if you have
MacOS X 10.2 Jaguar or later. |
 MacOS
X client version starting from 10.1 includes client for Windows networks,
but not server without which it is impossible to connect to ordinary
MacOS X workstation from Windows box. Fortunately, MacOS X Windows-compatible
networking is based on Samba
(industry-strength open source project). Project called Samba
X adds missing part and enables Windows file sharing services
on MacOS X. You can use Cocoa-based SSCT
(Samba Server Configuration Tool, entry level) or Web-based SWAT
(Samba Web Administration Tool, experts level, included with Samba
distribution) for configuration purposes. In order to use SWAT, launch
Web browser and connect to "http://your-server-IP:901".
However, you will need root
password to use SWAT.
MacOS
X client version starting from 10.1 includes client for Windows networks,
but not server without which it is impossible to connect to ordinary
MacOS X workstation from Windows box. Fortunately, MacOS X Windows-compatible
networking is based on Samba
(industry-strength open source project). Project called Samba
X adds missing part and enables Windows file sharing services
on MacOS X. You can use Cocoa-based SSCT
(Samba Server Configuration Tool, entry level) or Web-based SWAT
(Samba Web Administration Tool, experts level, included with Samba
distribution) for configuration purposes. In order to use SWAT, launch
Web browser and connect to "http://your-server-IP:901".
However, you will need root
password to use SWAT.
In order to remove Samba run "sudo
/usr/local/samba/removesamba" in terminal.
Revealing Hidden Stuff in MacOS X Finder
 There
is one quite simple way to reveal some hidden MacOS X UNIX underground
without using terminal. Download freeware Tinker
Tool and turn on "Show hidden
and system files". However, you should be very careful
and not move or delete UNIX stuff.
There
is one quite simple way to reveal some hidden MacOS X UNIX underground
without using terminal. Download freeware Tinker
Tool and turn on "Show hidden
and system files". However, you should be very careful
and not move or delete UNIX stuff.
Mounting Netatalk Shares on MacOS X
 If
you have Netatalk
v1.4.x (AppleTalk via TCP/IP emulator) on Linux or free BSD you may
notice that you will be no longer able to connect to shared volumes
from MacOS X (at least, this is true for MacOS X 10.04 and below).
However, there is one very simple trick to solve this problem. Launch
Classic, than famous Chooser accessory
and connect to Netatalk share via Chooser.
If
you have Netatalk
v1.4.x (AppleTalk via TCP/IP emulator) on Linux or free BSD you may
notice that you will be no longer able to connect to shared volumes
from MacOS X (at least, this is true for MacOS X 10.04 and below).
However, there is one very simple trick to solve this problem. Launch
Classic, than famous Chooser accessory
and connect to Netatalk share via Chooser.
PS. Netatalk 1.499 solved this problem.
Installing MySQL, PHP and MySQL Web Administrator
on MacOS X Client
This article have been completely rewritten and
moved to separate page.
UNIX Bits for MacOS X Users
Since MacOS X core called Darwin based on BSD Unix,
many Mac users probably will be very interested to know some MacOS
X underprintings. Additionally, it will definitely help you to become
the ones who are usually called "power users". If you will
be very careful, there will be no harm to use this power.
Users, Groups and Permissions
 UNIX
is multi-user system from the ground up. One of the aspects of this
feature means that every entity of OS
(including files and folders) belongs to certain user and group. Each
user (which, in turn, belongs to particular group) is permitted to
read, modify or execute them according to privileges (read/write/execute).
In MacOS X client version there are two types of publicly "visible"
user groups determined in System Preferences -> Users: "wheel"
group with administration privileges (system administrators or sole
users of MacOS X) and "staff"
group with administration functions disabled (usually ordinary users).
When certain user log in into the System, he can see, modify and execute
only things he allowed to according to privileges.
UNIX
is multi-user system from the ground up. One of the aspects of this
feature means that every entity of OS
(including files and folders) belongs to certain user and group. Each
user (which, in turn, belongs to particular group) is permitted to
read, modify or execute them according to privileges (read/write/execute).
In MacOS X client version there are two types of publicly "visible"
user groups determined in System Preferences -> Users: "wheel"
group with administration privileges (system administrators or sole
users of MacOS X) and "staff"
group with administration functions disabled (usually ordinary users).
When certain user log in into the System, he can see, modify and execute
only things he allowed to according to privileges.
Whatever you have created in MacOS X Finder
and applications will automatically belong to the current user and
the group staff. However, this
is not true for some UNIX software like system daemons (e.g. MySQL).
 By
default MacOS X Finder do not allow to change user and group. However,
it can be easily done in terminal. If you have difficulty using command
line tools you can do this with shareware utility called xFiles
written by Brian Hill (see tip above
for more info).
By
default MacOS X Finder do not allow to change user and group. However,
it can be easily done in terminal. If you have difficulty using command
line tools you can do this with shareware utility called xFiles
written by Brian Hill (see tip above
for more info).
UNIX has one special user called root.
Root is a supersuser which is allowed to do anything. Root is not
listed in MacOS X login in order to prevent damage of system components,
but you can still login as root using terminal (this procedure in
detail described here).
UNIX Directory Structure
UNIX directory structure is also very different
from classic MacOS. Here is a short list of directories which purpose
is more or less common for all UNIX variants:
| / |
Root directory, everything,
including mounted volumes (in UNIX they are represented as directories)
is inside this directory. |
| /bin |
Binaries needed to start up
OS |
| /dev |
Device files |
| /etc |
Configuration files, analog
of Preferences folder in classic MacOS. UNIX configuration files
are plain text files and thus, may be viewed and modified using
text editor. |
| /home |
Private directories of the
users, in MacOS X it is named "Users". |
| /sbin |
System binaries reserved to
the superuser |
| /lib |
Shared libraries, in MacOS
X named "Libraries". |
| /usr |
UNIX
system resources.
This directory includes essential UNIX components like source
code, help files, various scripts and executables. |
| /tmp |
Short-term temporary files. |
| /var |
Variable data (mail, databases,
print spool files, log files, etc.) belonging to certain software
packages (mail/Web/database servers, print spoolers, etc.). |
Please note that directories listed above are not
necessary located in root level (like on Linux). Many of these directories
in MacOS X are inside directory called "private"
which is hidden by MacOS X Finder. UNIX file and directory names are
case sensetive, directory names are separated with slash "/",
invisible items started with dot ".", that's why they are
often called dot items by UNIX
users.
|
All UNIX related directories and
files of MacOS X (hidden when MacOS X is running) are visible
and modifiable from classic MacOS resource editor like ResEdit.
However, editing MacOS X components from classic MacOS is really
bad idea. |
MacOS X from UNIX Perspective
MacOS X inherits from UNIX a vast number of GNU
utilities like compilers/interpreters for popular procedural and object-oriented
programming languages (C/C++, Java, Objective C, Pascal, Fortran,
etc.), high-level scripting languages (PERL, PHP), archiving (tar,
zip, pax), networking (Apache, Samba), and a lot lot more. It means
that much of software from FreeBSD and Linux without GUI, with Web
or Java based GUI, or (in general) with GUI which is not dependent
upon open source (like Gtk) or proprietary GUI libraries not ported
to MacOS X may be used on MacOS X just after recompiling. This time
very popular GUI library called called Qt (the heart of KDE)
which have been available on Linux and FreeBSD for a very long time
is already rewritten for MacOS X. Additionally, project called X Darwin
is aiming to bring XFree86 windowing system on MacOS X (using XFree86
on MacOS X is a pure hacking).
However, there is one
area where MacOS X 10.1 lags a miles behind Linux - its a package
management system with central search-able component database, or,
to be precise, complete lack of one. MacOS X installs as a single
whole (only few language kits, some BSD components and few printer
drivers may be omitted during installation), compiled UNIX software
on MacOS X is being thrown into the system without registering with
package manager which offers system-wide component search-able database
and uninstall features (although you can see which files are going
to be installed and view installation log in Apple Installer, or take
a look in BOM - Bill of Material files after installation). In
Linux, one can query RPM or Debian dpkg package manager in order to
see which files belong to particular software package, what exactly
this package does, when it was installed, and of course, you can test
if selected package can be safely installed, upgraded or removed without
conflicting with or breaking other software. Although some
MacOS X native applications (which are actually folders with components
inside and name extension ".app") may be safely removed
manually by dragging them into the trash, it is not true for UNIX
inherited software which may consist of hundreds or even thousands
of files scattered across private UNIX directories which are not visible
in MacOS X Finder. Uninstalling such software manually in terminal
may be a time consuming and painful process.
Few Terminal Commands
Open Application -> Utilities -> Terminal.
From here you can almost completely control your MacOS X box. Type
a command and press Enter to execute it. You can open as much windows
in Apple Terminal as you want. If you close terminal window you will
kill the process executed from this terminal. To interrupt time-consuming
command gracefully use Control-C. Please note that all UNIX shell
commands are case sensetive. In order to avoid typing path names too
often, you should set up current working
directory. It is something like opened folder window in the
Finder. Below you can find very short and brief list of some shell
commands.
| man |
display the on-line manual
pages |
You will use this command
very often, at least at the first time. Example "man
find", "man
cd". Use return to scroll down long manual pages,
type "Q" to quit. |
| pwd |
prints
the absolute pathname of the current working
directory |
Use this shell command to
understand where you are. |
| cd |
change
current working directory |
Example: "cd
/Users/Shared". You can drag and drop MacOS items
to terminal window in order to avoid typing absolute path manually. |
| ls |
list
directory contents |
Use "ls"
without arguments to list content of the current working directory,
"ls -a" to get list with invisible items, "ls -l"
(lowercase "L") for detailed information, or combined
"ls -al". |
| find |
find
something inside gived directory |
Example: "find
/Users -name "*.app" -print" - finds and
prints all MacOS X applications inside "Users" private
directories (MacOS X native applications are actually the folders
with extensions ".app", "*.app"
means anything which ends with ".app"). With "find"
you can locate UNIX items which are hidden to Sherlock. |
| open |
open
files and directories |
Use "open
-a TextEdit ..." to open and modify UNIX configuration
files not visible in the Finder and not accessible from System
Preferences, for example "open
-a TextEdit /etc/httpd/httpd.conf" will allow you
to view Apache configuration file. |
| su |
substitute
user identity |
Run "su"
without extra arguments, and after authentication you will be
logged on as root. |
| sudo |
allows a user to do
a command as the superuser or
another user |
Run "sudo
open -a TextEdit /etc/httpd/httpd.conf" in order to
view and modify Apache configuration file. |
| chown |
change
ownership of a file or directory |
Read any UNIX command reference
in order to learn how to properly use this commnd. |
Root Access in MacOS X
Since MacOS X core based on BSD UNIX, it is sometimes
necessary to gain root (superuser)
access in order to access some MacOS X hidden features.
|
Root (superuser) access is strongly discouraged
for anyone who is not familiar with UNIX! Unlike Linux, MacOS
X cannot be "repaired" by means of reinstalling separate
software packages. If you accidentally screw up something inside
MacOS X, most likely you will have to completely reinstall MacOS
X. |
The simplest way - open terminal and run "sudo
passwd root". You will be asked for administration password,
and then you can define root new password. If this does not work,
follow instruction below.
- Login to MacOS X as administrator (first
user created during first installation of MacOS X is always administrator,
however, not root).
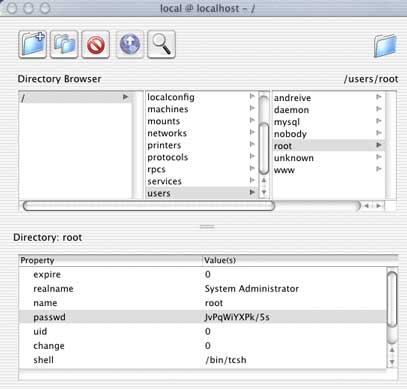
- Open Application -> Utilities -> NetInfo
Manager.
- Run from menu Domain -> Open. Type "security"
after "/" (slash) and click "Open".
- You will be presented with this dialog.

- Select Users -> root in the list and
choose from menu Domain -> Security -> Authenticate. NetInfo
Manager will ask for administration (not root!) password, enter
it and click OK.
- Select from menu Domain -> Security ->
Change Root Password. Enter new password (and make sure you can
remember it).
- Quit NetInfo Manager, then open Applications
-> Utilities -> Terminal, run "su"
(substitute user
identity) command, and after authentication you will be granted
with root access.
Please note that even if you gain root access,
nothing will be revealed in the Finder. All hacking have to be done
in terminal.
How to Completely Uninstall MacOS X
It may happen that something goes wrong inside
MacOS X and reinstallation using MacOS X installer does not help,
or, for example, you have no plans to keep MacOS X on particular hard
drive anymore. Follow these steps to do it fast and safe:
- Check you hard drive with disk utility like
Apple Disk Aid, Norton Disk Doctor, or just any other you trust.
- Backup your (and all other users !) data
from "Users" folder.
- If you have UNIX software packages like
MySQL or PostgreSQL you also need to backup their data files located
usually inside /usr/local/var
directory. It is not visible in the Finder, so you have to use terminal.
- Boot from classic MacOS.
- Trash or immediately erase visible MacOS
X folders - Applications (not "Applications
(Mac OS 9)"!), Library, System, Users; plus files called
mach and mach.sym.
- Use ResEdit or any other utility to make
visible and erase the following hidden MacOS X folders and files
on the root volume - automount, bin,
dev, mach_kernel, Network, private, sbin, usr, Volumes, .Trashes.
Please note that UNIX-specific MacOS X folders like "sbin"
may contain thousands of items.
- Please note that you will not
able to delete UNIX symbolic links
- cores, etc, tmp, var. Just leave them alone...
- If you reinstall MacOS X on the same volume
you will notice that orphaned UNIX symbolic links become something
like "tmp
(Mac OS 9)", "var (Mac
OS 9)", etc. Do not move them and their content in Trash!
You may delete important UNIX components! To erase them, open terminal,
gain root access
(read above
how to do this), run "cd
/" to switch to root directory, and then "rm
'cores (Mac OS 9)' 'etc (Mac OS 9)' 'tmp
(Mac OS 9)' 'var (Mac OS
9)'" (rm means
remove,
it is safe because without extra option it cannot remove directories).
You have to enclose directory names in quotes because they contain
spaces. Do not use "rm -R
*"(Mac OS 9)""! It will delete your "Applications
(Mac OS 9)" folder.