Safe and Happy UNIX Hacking with MacOS X
Preface
As I mentioned before,
MacOS X version 10.1 lacks package management system similar to RPM
or Debian APT which tracks system components in central search-able
database (may be Apple will fix this in one of the next versions).
This makes quite difficult maintaining UNIX inherited software, which
may consist of hundreds and even thousands of files scattered across
MacOS X UNIX-specific system directories not even visible in MacOS
X Finder. However, thanks to the Open Source community, managing some
UNIX software becomes much more easier and what is very important,
safer.
Credits
All described here would not possible without great
work of talented programmers - Christoph Pfisterer, Max Horn and all
others, who developed port
of the package management system from Debian/GNU
Linux (one of the most powerful and advanced this days) for MacOS
X. This port is called Fink.
Also, I would like to thank Marc
Liyanage who helped me with initial adoption of MySQL.
What is Fink?
 Fink
is a MacOS X port of package
management system APT (Advanced
Package Tool), package manager dpkg,
and some front-ends for these tools from Debian/GNU
Linux. However, this is only a part of Fink does for MacOS X.
The greatest feature of Fink is that
it creates its own UNIX directory tree (separated from MacOS X) where
it keeps all its files (UNIX directory tree in brief described
here).
Fink
is a MacOS X port of package
management system APT (Advanced
Package Tool), package manager dpkg,
and some front-ends for these tools from Debian/GNU
Linux. However, this is only a part of Fink does for MacOS X.
The greatest feature of Fink is that
it creates its own UNIX directory tree (separated from MacOS X) where
it keeps all its files (UNIX directory tree in brief described
here).
Fink, as well as all
UNIX software properly packaged with Fink (except Darwin/MacOS X version
of XFree86 windowing system) do not install anything into MacOS X
system directories (including "/usr/local") or alter any
MacOS X system file(s). Thus, it is completely safe. If something
goes wrong, one can just erase entire Fink directory without damaging
MacOS X. However, please take into account that Fink do not tracks
MacOS X native components, only software installed with Fink itself
!
Installing Fink
 |
If you have software from OpenOSX.com
(Database, Web or GIMP CDs) or MacOSX.Forked.net
you should remove them first! Some stuff from above mentioned
companies is created with Fink and then repackaged for MacOS X. |
Installing Fink is quite simple. Since Fink is
a quickly evolving software, and you may use different version from
main, installation procedure might be different, too. Fink distribution
supplied with excellent manual, so just look into it. For version
0.3, launch Fink installer, wait until it finishes, then create text
file named ".cshrc" (beginning
with dot ".") containing line "source
/sw/bin/init.csh" in your home directory Users -> Your
Name (run "echo "source
/sw/bin/init.csh" > .cshrc"), and finally run
"rehash" in terminal.
You will find "/sw" directory
in the root level of your startup volume. This is where Fink keeps
all its stuff.
Please note that Fink requires Apple Developer
Tools and MacOS X SDK (both are parts of MacOS
X Developer Tools CD available for free download) to be installed.
Upgrading Fink Core to the Next Release
Run "fink
selfupdate" in terminal. This time (version 0.3 release)
it is the only right way to upgrade
Fink core in auto-pilot mode to the next release. You should not
use MacOS X installer program and MacOS X Fink package for upgrade
purposes (only for first time installation). To upgrade the rest of
Fink installed components run "fink
update-all". In order to upgrade to cutting
edge release use technique described below.
Getting Started
|
- This article assumes that you have at
least basic knowledge of UNIX and terminal commands.
- Almost all commands below must be executed
in superuser mode (look here
how to gain root access in MacOS X).
|
Please note that you need fast Internet connection
to fetch source tarball(s) and Fink packages from the master site.
Run "fink list"
in order to see list of available Fink packages. 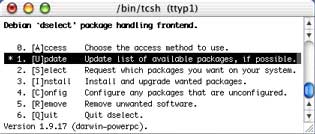 To
install (or upgrade) already precompiled
Fink-enabled packages I may advice to use dselect
(console based front-end to the Debian package manager dpkg).
It is quite confusing for novices, but very capable and powerful.
First of all, run Update command
in dselect (or "apt-get update"
in terminal) to fetch list of precompiled Debian-style packages which
are usually referred as debs (but
do not run Access,
it may overwrite Fink settings!). Then, in Select
section choose (with + key) whatever you what to install. And finally,
run Install. The dselect will automatically
resolve dependencies, download and install necessary components.
To
install (or upgrade) already precompiled
Fink-enabled packages I may advice to use dselect
(console based front-end to the Debian package manager dpkg).
It is quite confusing for novices, but very capable and powerful.
First of all, run Update command
in dselect (or "apt-get update"
in terminal) to fetch list of precompiled Debian-style packages which
are usually referred as debs (but
do not run Access,
it may overwrite Fink settings!). Then, in Select
section choose (with + key) whatever you what to install. And finally,
run Install. The dselect will automatically
resolve dependencies, download and install necessary components.
If you find dselect too cumbersome, just run "apt-get
install package-name" in terminal (but do not forget to
run "apt-get update"
first !). If "apt-get install
package-name" fails to install known
package, it means that selected package is not available yet as precompiled
deb from Fink master site, it have to be downloaded as source tarball
and compiled locally. In this case
you should run "fink install
package-name". Please take into account that this process
my be very time consuming.
Brief list of some Fink, apt-get and dpkg commands
is available below.
| fink list |
Lists available Fink packages |
At the time of Fink version 0.3 release
227 packages available |
| fink describe package-name |
Prints comprehensive description of specified
package |
|
| fink install package-name |
Downloads source tarball, compiles, and
installs compiled deb package |
1) Checks package dependencies; 2) might
be very time consuming, try to use "apt-get
install package-name" instead whenever possible |
| fink build package-name |
Downloads source tarball if it is not
present and builds deb package |
No installation performed |
| fink rebuild package-name |
Works like "fink
build", but replaces current deb package |
Automatically upgrades package with the
newest build if another one was installed before |
| fink remove package-name |
Removes specified package |
Warning !!! Does not check dependencies
(Fink version 0.3 and below), so be very careful, use "apt-get
remove", "dpkg
--remove" or "dpkg
--purge" instead |
| fink selfupdate |
Updates Fink and its core components |
This is the only right way to upgrade
Fink core to the new release! |
| apt-get update |
Fetches lists of available deb packages
from master site |
|
| apt-get install package-name |
Downloads and installs specified deb
package |
Preferred method of installation, but
do not forget to run "apt-get
update" first! |
| apt-get remove package-name |
Removes package |
Preferred method of removal, checks package
dependencies |
| dpkg --install package-name |
Installs selected deb package |
Checks package dependencies, but do not
fetches dependent items |
| dpkg --remove package-name |
Removes package, but leaves configuration
files |
Checks package dependencies |
| dpkg --purge package-name |
Removes package and its configuration
files |
Checks package dependencies |
|
man fink
man apt-get
man dpkg
|
Displays manual pages for Fink, apt-get
and dpkg respectively |
|
What is the difference between "apt-get
install package-name" and "dpkg
--install package-name" one may ask? "apt-get
install ..." will search
for the specified package in the known
package list and then will download and install it (example
- "apt-get install mysql"),
while with "dpkg --install ..."
it is required to explicitly specify
file name and path of the deb package
(example - "dpkg --install
/Users/Shared/mysql_3.23.43-2_darwin-powerpc.deb"). Both
perform checking of package dependencies, but only "apt-get"
will automatically fetch and install
dependent items. In short, "apt-get"
is preferred over "dpkg"
whenever possible because it is higher-lever tool.
Another Fink Benefits
Fink may install some very useful Open Source UNIX
software which is missing from MacOS X (or is just incomplete) like
bzip2 (Burrows-Wheeler block sorting
compressor with Huffman coding), wget
(http/ftp recursive file retriever), tar
(tape archiver which really works), Midnight
Commander (very popular among Linux/FreeBSD users console based
file manager), MySQL/PostgreSQL
(powerful open source SQL database servers), and much much more, all
this (except XFree86 installation) without altering MacOS X system
directories.
Creating deb Packages for MacOS X/Fink
Full and comprehensive instruction available
at Fink Web site, however, it assumes that you are an UNIX programmer.
Below you will find some explanation how to quickly build your own
deb without digging deep.
In short, you need to place source tarball and
package description file into proper directories and run "fink
build package-name". The top level build directory is
"/sw/finks/dists". 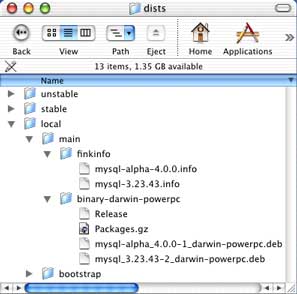 It
contains 3 subdirectories (let's call them release
status trees) - stable (final
or stable releases), unstable (beta,
testing or experimental releases), and local
(releases built locally by administrator). Most likely all your home
brewed software will go into local. Each release status tree contains
two subdirectories - finkinfo (for
package description files and patches) and binary-darwin-powerpc
(for compiled deb packages). All source tarballs must be placed into
"/sw/src/", or you may
specify download URL in the package description file. Writing package
description file from scratch may be rather tricky, so it is much
easier to modify existing ones. For example, Fink 0.3 have been supplied
with MySQL 3.23.42 without InnoDB, but I am needed MySQL 3.23.44 with
InnoDB transaction safe table support. I have had to change just few
lines in package description file (version #, revision #; and add
compilation configuration parameter "--with-innodb"). You
can download original and modified package description *.info files
here.
It
contains 3 subdirectories (let's call them release
status trees) - stable (final
or stable releases), unstable (beta,
testing or experimental releases), and local
(releases built locally by administrator). Most likely all your home
brewed software will go into local. Each release status tree contains
two subdirectories - finkinfo (for
package description files and patches) and binary-darwin-powerpc
(for compiled deb packages). All source tarballs must be placed into
"/sw/src/", or you may
specify download URL in the package description file. Writing package
description file from scratch may be rather tricky, so it is much
easier to modify existing ones. For example, Fink 0.3 have been supplied
with MySQL 3.23.42 without InnoDB, but I am needed MySQL 3.23.44 with
InnoDB transaction safe table support. I have had to change just few
lines in package description file (version #, revision #; and add
compilation configuration parameter "--with-innodb"). You
can download original and modified package description *.info files
here.
Using Cutting Edge Version of Fink
Fink is being developed very actively, and the
last packaged binary release may not be actually up to date. In this
case you can install packaged release and then upgrade it to the cutting
edge CVS version. In order to upgrade Fink core to CVS version run
the following commands: "mkdir
fink-cvs" (this will create temporary directory for Fink
sources to be downloaded from CVS), "cd
fink-cvs", "cvs
-d:pserver:anonymous@cvs.sourceforge.net:/cvsroot/fink login"
(you will be asked for password, just press Enter), "cvs
-z3 -d:pserver:anonymous@cvs.sourceforge.net:/cvsroot/fink co fink"
(it will take some time to download required files), "cd
fink", "./inject.pl".
You can remove temporary directory with "rm
-R fink-cvs" or leave it for future updates from CVS.
To update existing local Fink CVS sources run "cd
fink-cvs/fink", "cvs
-z3 update -d" and then "./inject.pl"
to update Fink itself.
After you have upgraded Fink it is time to get
catalog of packages available from CVS. Run "mkdir
fink-cvs", "cvs
-d:pserver:anonymous@cvs.sourceforge.net:/cvsroot/fink login"
(you will be asked for password, just press Enter), "cvs
-z3 -d:pserver:anonymous@cvs.sourceforge.net:/cvsroot/fink co packages",
"cd packages",
"./inject.pl".
The only remaining step is to build and install packages - "fink
update-all".
Q&A
Q. What to do if one want to rebuild an existing
Fink package but with different compilation options?
A. Modify existing *.info file (increment revision number) and copy
it into local tree, then run "fink
build package-name", "dpkg
--install package-name".
Q. How to tinker with stuff from the unstable
tree (beta, testing, experimental, etc.)?
A. Copy desired package description
(*.info) and patch
(*.patch) files from unstable tree "/sw/fink/dists/unstable/..."
to local one "/sw/fink/dists/local/..." and run "fink
build package-name".
Q. The package I am looking for seem to be not
available.
A. 1) Look in the unstable tree; 2) create it yourself.
Q. I am running "fink
build package-name", but Fink tries to compile and build
a lot of dependent packages, it will take hours or even days !!!
A. Fink build tool is not advanced enough yet and it does not check
if precompiled dependent packages are available (at least this is
true for Fink version 0.3). There are two solutions: 1) install existing
package (if it exists, of course), with "apt-get
update", "apt-get
install package-name", then upgrade to your own version
or revision; 2) manually install dependent packages with "apt-get
update", "apt-get
install dependent-package-name".
Q. The "apt-get
install package-name" fails to install known
package (error message - package not found). What to do?
A. Please read this article carefully again from the beginning. In
short - it means that requested package is not yet available as precompiled
deb. Use "fink install package-name"
instead, it will download, compile and install package from sources.
Q. How to install XFree86 with Fink?
A. Excellent guide called "Running
X11 on Darwin and Mac OS X" written by Christoph Pfisterer
is available here.
Q. I have a problem with Fink and could not figure
out how to solve it.
A. 1) Study Fink manual, other resources and be creative; 2) subscribe
to the Fink
mailing lists and ask there for help. However, please be patient
and polite, and don't get mad if you won't get desired answer. Nobody
is obliged to help you unless you paid for support contract. After
all, you got Fink software for free.
Example - Building
MySQL (with InnoDB) deb for MacOS X/Fink
- Download my
package description files and copy them to "/sw/dists/local/main/finkinfo/".
You cannot do it with MacOS X Finder, so run "cp
mysql-3.23.44.info /sw/fink/dists/local/main/finkinfo"
in terminal.
- Download MySQL 3.23.44 source tarball from
www.mysql.com
and copy it into "sw/src/"
("cp mysql-3.23.44.tar.gz
/sw/src"), or specify download URL in package description
file (I had tarballs hosted on my local workstation, so you may
have to update download URL according to your setup). There is nothing
to be changed in the source tarball itself, it may be used as is.
- Run "fink
list". You should see "mysql
3.23.44-1 MySQL with InnoDB Support " in the list of
available Fink packages. If you have another MySQL version already
installed, Fink's list item will look like "(i)
mysql 3.23.44-1 MySQL with InnoDB Support" ("(i)"
stand as another version installed).
- Run "fink
build mysql" and wait, it will take some time to compile
MySQL and build deb package. MySQL deb will be located in "/sw/fink/dists/local/main/binary-darwin-powerpc/"
directory, with symbolic link (analog of MacOS alias) in "/sw/fink/debs/"
for easier navigation.
- Run "cd
/sw/fink/debs/", "dpkg
--install mysql_3.23.44-1_darwin-powerpc.deb". Please
note that you do not need to run
mysql_install_db script,
it will be done for you at post-install stage.
- InnoDB
support must be explicitly enabled in MySQL configuration file "my.cnf",
for the smoke test just take main,
copy it into "/sw/var/mysql" and set proper permissions
("cp my.cnf /sw/var/mysql/",
"chown -R mysql /sw/var/mysql/my.cnf").
- In order to
make MySQL data directory readable in the MacOS X Finder run
"chmod go+rx+rx /sw/var/mysql".
- Launch MySQL daemon from terminal with "safe_mysqld
--user=mysql &" (for 3.x version) or "mysqld_safe
--user=mysql &" (for version 4.x) commands. Run
"daemonic enable mysql"
to create startup item for MySQL daemon.
- Take a look into "/sw/var/mysql/",
if everything is OK you will find there InnoDB data and log files.
- You may build MySQL 4.x alpha version, too,
but the package will be named mysql-alpha.
You will need to rename source
tarball and enclosing source
directory accordingly.
|
MySQL 3.23.4x and 4.0 alpha do
not shutdown cleanly due to incomplete POSIX thread implementation
in Darwin/MacOS 10.1. This problem is fixed in MySQL 3.23.47 and
later. |
Downloads
MySQL deb for MacOS X is available for download
here.